 Click on images to view full pages. Scroll down for text.


Much has been told of the marvelous results obtained by tank farming, but little about exactly how it is done. This article is intended to remove the mystery and show amateur gardeners the latest methods used in this new science of plant culture, often known as soilless farming, hydroponics, or water culture.
Groups are springing up everywhere in California to try their luck at this fascinating type of gardening. This interest is largely due to the efforts of Prof. William F. Gericke of the University of California.
In tank farming the solution is held in a tank, and the vegetable or flower plants are grown in trays resting on top. Elements required by the plants are added to the water in the form of soluble salts.
For best growth, the solution must be kept at a uniform temperature and also circulated, unless some method of air blowing is devised for aeration. The tank illustrated has provision for both heating and circulating the solution automatically.
Tweet about this article…
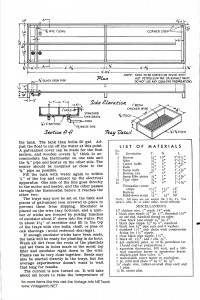
Fasten the sides, ends, bottom, and three bottom ties with screws in preference to nails. See list of materials for sizes. Use casein glue on all the joints. Put in the center baffle, but notch out a piece 11/2” by 6″ on the bottom at the sump end. Add the sump wall pieces, corner pieces, center braces, and sump tiller pieces. Drill 1″ holes for the 3/4” pipes and the return hole to the sump, and a 1 5/8” hole for the sink drain.
Install all pipes and fittings. Take care that the 3/4” by 11″ nipple is mounted so that the 3/4” slot, which should be cut in it as shown, is 1/2” below the water line. The water line is 2” below the top of the tank and runs through the middle of the return hole. Add the bottom battens and apply the water-proofing.
A wire helix is fastened to the long motor-driven mixing rod as shown (the regular mixing disk being discarded) and the motor itself mounted by the method indicated. Note that the helix must be wound in a direction opposite to the rotation of the motor. The tank then holds 50 gal. Adjust the float to cut off the water at this point. A galvanized cover can be made for the float section, and wooden covers 3/4″ thick to accommodate the thermostat on one side and the 3/4″ pipe and heater on the other side. The heater should be mounted as close to the 3/4” pipe as possible.

For more modern info on Hydroponic Gardening, check out this best selling book on Amazon! (click the image).
Fill the tank with water again to within 1/4” of the top and connect up the electrical apparatus. One side of the line goes directly to the motor and heater, and the other passes through the thermostat before it reaches the other two.
The trays may now be set on the tank and pieces of galvanized iron screwed in place to prevent them from slipping. Excelsior is placed on the wire tray bottoms, and a number of wicks are formed by poking bunches of excelsior about 3” down into the water. Put in about 2 1/2″ of excelsior and fill to the top of the trays with rice hulls, chaff, or pine or oak shavings (avoid redwood shavings).
If enough excelsior wicks have been made, the tank will be ready for planting in an hour. Wash all dirt from the roots of the plantlets and set them in holes made in the moist top tiller and excelsior right down to the wire.
Plants can be very close together. Seeds may also be started directly in the trays, but the average experimenter doesn’t want to wait that long for results.
The current is now turned on. It will take about six hours to raise the temperature of the water from 60 to 85 deg. F. Keep an accurate thermometer in the water until this temperature has been reached; then turn the adjusting knob on the thermostat to cut off the current.
Chemicals do not need to be added for a few days after transplanting, or until the roots begin to grow into the water. I suggest tomatoes for the first experiments. The following solution, from the Ohio Experimental Station, is especially recommended for tomatoes: Potassium nitrate, 3 oz.; calcium nitrate, 3 oz.; magnesium sulphate, 1 1/4 oz.; mono calcium phosphate, 3/8 oz.; ammonium sulphate, 3 1/2% oz. Dissolve each in about 1/2 gal. of water separately and pour them into the tank in the order given.
In addition, 2 12 oz. boric acid must be dissolved in 1/2 gal. of water, and 1 fluid oz. placed in the tank once each week. Also dissolve 8 3/4 oz. ferrous sulphate in 1 gal. of water and add to it 1/2 fluid oz. of sulphuric acid solution (1 oz. concentrated acid in 31 1/2 oz. water). Put 1 fluid oz. of the iron solution into the tank once a day.
The degree of acidity or alkalinity (the pH) is most important. For tomatoes pH 5.5. has been found satisfactory. A test set can be obtained that consists of papers impregnated with a dye and an accompanying color chart, each color bearing a pH number ranging from pH 4 to pH 10. One of the strips is dipped into the tank and the resulting color reaction compared with the chart. As the solutions tend to become alkaline, it is necessary occasionally to add a small amount of the dilute sulphuric acid. If the solution should go over too far on the acid side, use a small amount of potassium or sodium hydroxide solution (a pellet dissolved in a quart of water). When one becomes familiar with the routine, the correct pH is easily maintained.
This solution, although recommended for tomatoes, will also work satisfactory with cucumbers, squash, and most flowers.
The circulator, when operating, forces the solution down the 3/4″ pipe from the sump up into the bottom of the tank, where it moves gradually around the center baiiie and returns through the hole in the sump. There it picks up additional heat before going through the same cycle again. When the temperature of the water reaches the established high point, the thermostat cuts OE both the circulator and the heater.
Source: Popular Science, April 1939 – click HERE to purchase a copy from Amazon.
Now over to you….
Have you given hydroponics a shot? How has it worked for you? Care to share any tips with the rest of us?
Post below in the comments 🙂
Please note: Posts may contain affiliate links for products we have used or researched. If you purchase a product through an affiliate link, your cost will be the same and Vintage Info Network will automatically receive a small referral fee. Your support helps to fund this website. Thank you.
